4 Feed-In Braids: A Stylish and Versatile Hair Trend
Braided hairstyles have taken the hair world by storm. They're not just a trend; they're a statement of style that many people love to wear day in and day out. Whether you're a fan of braids or simply intrigued by the idea, this article is your guide to one of the hottest trends – 4 Feed-In Braids.
But here's the deal: achieving those stunning braids you see on social media and your favorite celebs isn't just about skills and technique. The secret sauce? Quality human hair. It's the foundation for braids that turn heads, and we're here to spill the beans on how to make it happen.
In the next few minutes, we'll walk you through the process of creating 4 Feed-In Braids. Don't worry if you're not a hair expert; we've got your back with a simple, step-by-step guide. We'll also talk about maintenance, styling options, and everything you need to know to rock this look with confidence. So, grab your hair tools, and let's get started on this braiding adventure!
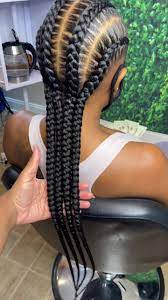
What Are Feed-In Braids?
Feed-in braids are like the upgraded version of traditional braids. Unlike regular braids, where you start with your natural hair from the get-go, feed-in braids involve adding extensions as you braid. This little tweak works wonders. It gives your braids a more natural look, blending seamlessly with your hair. It's like magic, but not really.
Benefits You'll Love:
So, what's in it for you? Well, feed-in braids bring a whole lot to the table. First off, they're super gentle on your scalp. That means no more wincing in pain during the braiding process. Plus, the result is remarkably natural – nobody can tell you've added extensions. It's like your hair, only better.
Versatility for Any Occasion:
Feed-in braids are like the chameleons of the hair world. You can rock these braids whether you're chilling with friends, heading to a formal event, or just having a regular day. They're a stylish choice that fits any occasion.
So, there you have it - the lowdown on feed-in braids. They're a game-changer, and we're here to help you master the art of braiding like a pro.
Preparing Your Hair for Feed-In Braids
Before you dive into creating those stunning feed-in braids, there are a few important steps you should take to get your hair ready. It's all about setting the stage for braiding success.
Hair Prep 101:
Washing, Conditioning, and Detangling - These three steps are your best friends.
- Washing: Start by giving your hair a good wash. It's essential to start with clean hair; no one wants to braid dirty locks. Use a mild shampoo and make sure you rinse thoroughly. Clean hair is the canvas for a beautiful braid.
- Conditioning: After washing, apply a good quality conditioner. This helps to keep your hair soft and manageable. Leave it on for a few minutes before rinsing. Well-conditioned hair is easier to work with.
- Detangling: The last thing you want is a tangled mess when you start braiding. So, comb your hair carefully to remove knots and tangles. A detangling spray or a wide-toothed comb can be your best friend in this step.
Choosing the Right Hair:
Now, let's talk about the extensions. The type and texture of human hair you choose are crucial for nailing those feed-in braids.
- Type: Match the hair type to your own. If you have straight hair, go for straight extensions. If your hair is curly, choose curly extensions. It's all about creating a seamless, natural look.
- Texture: Consider the texture of the human hair. Some hair is fine, while others are coarser. Again, try to match it to your own hair so that it blends in seamlessly.
By giving your hair some TLC and selecting the right type and texture of human hair, you're setting yourself up for braid success. With a clean canvas and quality extensions, those feed-in braids are going to look amazing!
Tools and Materials
Creating fabulous feed-in braids requires the right tools and materials in your arsenal. Here's your checklist:
- Hair Extensions: This is the star of the show. Choose high-quality human hair extensions or human braiding hair that match your hair type and texture. You can go for synthetic hair, but human hair often looks more natural and lasts longer.
- Combs: You'll need a rat-tail comb for parting your hair and a wide-tooth comb for detangling. These are essential for creating neat and even sections.
- Clips: Hair clips or bobby pins are handy for keeping your sections separate and preventing hair from getting in the way.
- Edge Control Product: An edge control product, like gel or wax, is perfect for taming those baby hairs and creating a sleek, polished look.
- Hair Ties or Rubber Bands: These help secure your extensions as you braid. Choose snag-free options to avoid breakage.
- Hair Accessories (optional): If you want to add a little flair to your braids, consider decorative hairpins, beads, or hair cuffs.
- Hair Oil or Serum: Use a hair oil or serum to add shine and moisture to your braids, keeping them looking fresh and healthy.
- Mirror: You'll want a mirror to check your progress as you braid, especially if you're working on the back of your head.
- Spray Bottle: Fill it with water to keep your hair damp while braiding, making it more manageable.
- Shears or Scissors: These come in handy for trimming any excess hair after you're done braiding.
Having the right tools and materials at your disposal makes the whole process of creating feed-in braids smoother and more enjoyable. So, get your kit together, and let's get to work!
Step-by-Step Guide to Creating 4 Feed-In Braids
Creating 4 Feed-In Braids is not only about achieving a stunning hairstyle but also about adding a touch of creativity to your look. In this step-by-step guide, we'll show you how to create these braids and even add some flair with unique parting styles. Let's get started:
Step 1: Get with Parting
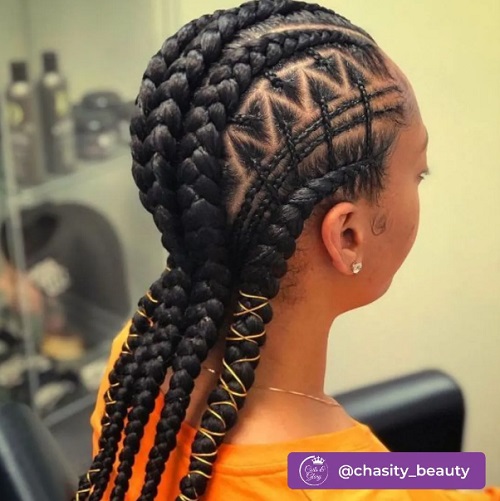
- Begin by parting your hair into four sections. You can add a personal touch by creating curved parts, straight parts, or even fun designs like hearts or stars. This is where the "4" in 4 Feed-In Braids gets its name. Let your creativity shine!
Step 2: Extension Placement
- Apply a bit of edge control product to the roots of your hair to ensure a sleek look.
- Attach a small piece of the extension to the roots of your natural hair in each of the four sections.
Step 3: Begin Braiding
- Start braiding your natural hair while incorporating the extension hair. As you continue down, add more extension hair to achieve the feed-in effect.
Step 4: Neat and Even Braids
- Keep an eye on maintaining even tension throughout the braiding process. Avoid braiding too tightly to prevent discomfort.
- Secure each braid with a small hair tie or rubber band at the end.
Step 5: Express Yourself
- This is where you can add a unique touch to your 4 Feed-In Braids. Choose how you want to finish the ends of your braids, whether it's with beads, cuffs, or any other accessory that suits your style.
Tips for a Polished Look:
- Even tension is key to comfortable and attractive braids.
- Apply edge control product for sleek edges and to prevent frizz.
- Keep your parts neat, ensuring symmetry in your design.
- Trim any excess hair at the ends to ensure all your braids are the same length.
Visual Guide:
For a more visual demonstration, you can find online tutorials or videos that provide step-by-step instructions, and you can explore various chic parting styles to make your 4 Feed-In Braids uniquely your own.
With these steps and a dash of creativity, you'll rock your 4 Feed-In Braids with style and flair. The possibilities are endless, so feel free to experiment and make it your own!
Maintenance and Care
So, you've got those fantastic 4 Feed-In Braids, and you want to keep them looking fresh and fabulous. That's where maintenance and care come in. Here's how to ensure your braids last longer and stay on point:
Washing:
- Use a sulfate-free shampoo and dilute it with water. Gently apply the diluted shampoo to your scalp.
- Avoid heavy scrubbing; instead, massage your scalp and braids with your fingertips.
- Rinse thoroughly to remove any shampoo residue. Let the water flow through your braids, and make sure no product is left behind.
Moisturizing:
- Use a lightweight, water-based leave-in conditioner or a braid spray to keep your braids moisturized. Dry braids can lead to frizz and breakage.
- Apply the product to your braids and scalp. Use your fingertips to distribute it evenly.
- Be mindful of the amount – too much product can make your braids feel heavy and greasy.
Scalp Protection:
- Protect your scalp from dryness and itchiness by applying a natural oil like jojoba, coconut, or olive oil. Use a small amount and massage it into your scalp.
- To prevent buildup, avoid overusing heavy oils or products that contain silicone.
Cover Up:
- While sleeping or when exposed to harsh weather conditions, it's a good idea to cover your braids with a satin or silk scarf or bonnet. This helps to prevent frizz and preserve the braids' sleek look.
Avoid Excessive Tension:
- Be gentle with your braids. Avoid styles that put too much tension on them, as this can lead to hair breakage.
- Opt for looser updos or styles that don't pull on the braids excessively.
Regular Touch-Ups:
- Keep an eye on the roots of your braids. As your natural hair grows, you may need to touch up the edges to keep them looking fresh.
By following these care and maintenance tips, you'll extend the life of your 4 Feed-In Braids and keep them looking beautiful and healthy. With a little TLC, your braids will continue to turn heads and make a statement.
4 Braids: Styling and Versatility
The charm of 4 Feed-In Braids lies in their incredible adaptability, allowing you to explore a wide array of styles. Here, we showcase various stunning options, providing in-depth descriptions and tips to achieve each look:
1. Classic 4 Braids Straight Back:
The classic 4 Feed-In Braids swept straight back offer a timeless and elegant appearance. This style exudes sophistication and grace, framing your face beautifully.
Tips to Achieve: For a flawless outcome, ensure precise parting for symmetrical braids, and maintain consistent tension while braiding to create a polished finish.
2. Two Buns:
Dividing your braids into two sections and fashioning them into two buns brings a playful and chic look. This style adds a touch of youthfulness and can be perfect for casual gatherings or when you want a fun twist.
Tips to Achieve: Use hair ties or pins to secure the buns in place. For a relaxed vibe, gently pull out a few baby hairs.
3. 4 Feed-In Braids with Curled Ends:
Adding delicate curls to the ends of your braids imparts a sense of sophistication and individuality. This style allows you to enjoy the best of both worlds – the fun of braids with a hint of curly charm.
Tips to Achieve: Utilize a curling iron or flexi rods on the ends of the braids. Ensure uniform curls to achieve a chic and coherent look.
4. Curved 4 Braids:
Flex your muscles by opting for curved or intricate patterns in your braids. These unique designs can be both visually striking and attention-grabbing, making your hairstyle truly one-of-a-kind.
Tips to Achieve: Whether you choose curved parts or more elaborate designs, precision is key. Use a comb or your fingers to create the desired shapes that align with your style.
Adaptability for Any Occasion:
- Casual: Wear your 4 Feed-In Braids loosely or tie them up in a bun for a relaxed, effortless appearance, perfect for everyday activities and hanging out with friends.
- Formal: For formal events, opt for sleek and well-maintained braids. These can add an air of refinement to your overall look, and you can even enhance your style with decorative pins or cuffs.
- Special Occasions: For those extraordinary moments, let your creativity shine. Beads, glitter, and other embellishments can be used to infuse your braids with a unique and festive appeal.
4 Braids are not just a hairstyle; they're a canvas for your creativity. Whether you're heading out for a casual day, a formal event, or a special celebration, your braids can be adapted to suit the occasion, making you the center of attention in any setting.
Maintaining Your Human Hair Extensions
Your 4 Braids wouldn't be complete without the human hair extensions that add length and fullness to your style. Taking proper care of these extensions is essential to ensure they stay beautiful and last a long time. Here's why it's important and how to maintain them:
- Longevity: Well-maintained extensions can be used for multiple installations, saving you money in the long run.
- Quality: Maintaining your extensions keeps them looking fresh and healthy, enhancing the overall appearance of your braids.
- Reusability: Proper care allows you to reuse your extensions for future styles, reducing waste.
Tips for Extension Maintenance:
Tip 1: Regular Washing: Just like your natural hair, human hair extensions benefit from occasional washing. Use a mild, sulfate-free shampoo and conditioner to keep them clean and fresh.
Tip 2: Detangling: Extensions can tangle, especially at the ends. Gently comb them with a wide-toothed comb to remove knots and prevent breakage.
Tip 3: Moisturizing: Keep your extensions hydrated with a leave-in conditioner or hair oil. Apply it sparingly to maintain its softness and shine.
Tip 4: Heat Styling: If you plan to style your extensions with heat, use a heat protectant to shield them from damage. It's essential to be cautious with the heat settings to avoid overexposure.
Tip 5: Storage: When you're not using your extensions, store them in a cool, dry place to prevent tangling and damage. Many people use plastic bags or dedicated storage containers.
Tip 6: Reinstallation: If you decide to reuse your extensions for another braiding style, make sure to clean and condition them before reinstallation.
Tip 7: Quality Matters: Invest in high-quality human hair extensions from reputable suppliers. Quality extensions are more resilient and easier to maintain.
By following these tips and maintaining your human hair extensions, you'll extend their lifespan, saving you money and ensuring your 4 Feed-In Braids always look their best. It's all about keeping your style fresh, stunning, and eco-friendly.
Frequently Asked Questions (FAQs)
Feed-in braids are a fantastic and versatile hairstyle, but they can come with questions and concerns. Here, we've addressed some of the most common queries to help you better understand this trendy braiding technique:
Q: How long do Feed-In Braids typically last?
A: With proper care and maintenance, Feed-In Braids can last anywhere from two to six weeks. The longevity depends on factors like your hair growth, the quality of extensions, and daily wear and tear.
Q: Do Feed-In Braids cause damage to natural hair?
A: When done correctly, Feed-In Braids shouldn't cause damage to your natural hair. Ensuring even tension and not braiding too tightly can help prevent issues.
Q: Can I wash my Feed-In Braids?
A: Yes, you can wash your Feed-In Braids. Use a diluted, sulfate-free shampoo, and be gentle when cleansing your scalp. Properly rinse to remove any product residue.
Q: Can I swim with Feed-In Braids?
A: While swimming is possible with Feed-In Braids, it's advisable to protect your braids with a swim cap or by securing them in a bun. Chlorine and salt water can be harsh on your hair.
Q: Are Feed-In Braids difficult to create on your own?
A: The complexity of creating Feed-In Braids depends on your level of experience. While it may take some practice, many individuals learn to braid their hair with time and patience. Alternatively, you can seek a professional stylist's help.
Q: Can I add color to my Feed-In Braids?
A: You can add color to your braids by using colored extensions. These extensions come in various shades, and you can choose one that complements your style.
Q: What products should I use to maintain my Feed-In Braids?
A: Opt for hair care products that are sulfate-free, as these are gentler on your braids. You may also use leave-in conditioners, edge control products, and oils for moisturizing.
Q: How can I prevent frizz in my Feed-In Braids?
A: To prevent frizz, apply a leave-in conditioner or hair oil regularly to keep your braids moisturized. Additionally, securing your braids in a satin or silk scarf while sleeping can help reduce friction and frizz.
These are just a few of the many questions and concerns people have about Feed-In Braids. If you have more specific queries or uncertainties, don't hesitate to consult a professional stylist or fellow braiding enthusiasts for guidance.
Conclusion:
In this guide to 4 Braids, we've unraveled the secrets to achieving a stunning and versatile hairstyle. The beauty of 4 Feed-In Braids is that they offer limitless possibilities for creativity, adaptability for any occasion, and an eco-friendly approach with reusable human hair extensions.
So, what are you waiting for? It's time to embrace the world of 4 Feed-In Braids and make them your own. Whether you're going for a classic, elegant look or adding a twist to your personal style, these braids are sure to turn heads.
If you're ready to explore this trendy hairstyle and elevate your look, don't forget to check out our premium quality human hair bulk for braiding at elfinhair.com. Elfin Hair offers a wide range of high-quality human hair extensions to help you achieve the perfect Feed-In Braids and other stunning styles.
Visit elfinhair.com and discover exceptional human hair extensions and human hair wigs to enhance your braiding game. Your hair transformation journey begins here!
Related Articles:
Discover Your Perfect Cornrow Braid Style Today
16 Popular Half-Braided Hairstyles For Black Hair
Protective Styles For Black Hair
Braids with Curls for a Stunning Look

 USD
USD EUR
EUR GBP
GBP CAD
CAD AUD
AUD


